So, now that I have dug myself out of the photo shoots, the piles of paper and 'inspiration' on my desk and returned the emails that reproduce in the night I can finally share all of my exciting news. So, out of the two styling events for my paper designs not only one but BOTH were featured in the same week on Amy Atlas Events, Hostess with the Mostess and Chic and Cheap Nursery. I was walking on air the entire morning of Oct. 14 when I saw my name, little old Libby Lane Press, in lights (ok, not really lights) on Amy Atlas' blog featuring my Birds of a Feather Halloween photo shoot. Pinch me-- really, my first featured debut was on the Queen of Dessert tables blog. Does it get any better than this? Why yes, it gets equally as good. The Honeybee Gender Reveal was featured on Hostess with the Mostess on October 18. {Insert child-like squeal here}. And then if all of that wasn't enough, the oh so patient and sweet Nicole from Chic and Cheap Baby Nursery featured the Honeybee photo shoot on her darling site on October 20.
For those of you that know exactly what goes into a styling event you know this was no easy feat, however I worked tirelessly through the night for many nights, coordinated with talented and kind vendors and met new and creative people along the way and I would do it all again in a minute. Well, matter of fact.. I am ! Get ready for Hanukkah and Christmas. Since we celebrate both in our house you can expect dessert tables for both.. {did I really just say that}?
Thanks for spreading the Libby Lane love and I am looking forward to seeing where this roads takes me..
Tuesday, October 25, 2011
Tuesday, October 11, 2011
Texture, please
I am a huge fan of anything with texture. I adore ruffles, love bows and my current fav for fall {and anytime really} is BURLAP. Who knew that something with such an industrial sounding name could be so pretty and add just the right about of girly-ness while not being pink and flowery.
So, if you need to add a twist to a floral arrangement try a burlap ribbon instead of satin or grosgrain. If you like to add texture to your walls, try a burlap matting to your framed picture. Or my personal favorite.. use it to make a tablecloth.. ruffles and burlap-- now that is like tomato soup to my grilled cheese sandwich.
![]() |
| via Pinterest |
Monday, September 26, 2011
House Talk: Painting diamonds on the wall
When trying to come up with my blogging calendar I often struggle. So, this time I decided to take a stroll around my own home for inspiration so what you are getting is a real life look at my painting abilities {or measuring, for that matter.. }.
When we moved into our house five years ago I knew I wanted something a little different and dramatic for the dining room. At that point wallpaper was not my thing, although I lust over it now despite the painful hanging process. Note to self: My next dining room WILL have wallpaper. This was our first house so it has been a learning experience. Nonetheless, I am pleased when I see the outcome of the many pencils marks, levels and pieces of paper with various mathematical problems scribbled all in pursuit of the perfect dimension for the dining room diamonds.
Once, I knew the color palette I was looking for I bought a large piece of foam board, painted it, held it to the wall at different times of day to determine if I could live with it. Some may think this is a little over the top, but this was also a live and learn lesson that has since saved me time, energy and paint! I settled on two blue-ish gray colors. The lighter tone being the base color and the darker as the diamond.
Next, was truly the most complicated part out of this process. Trying to measure and line up the diamonds to the walls was rather cumbersome especially since we were only working with 2 full walls, not an enclosed area. So, we started in the corner and worked our way out.
First, we measured the wall space and then divided the width and height by the amount of diamonds we were hoping to paint. This was tweaked a few times once we actually used a pencil and drew the lines on the walls and used blue painter's tape to test the results of the math. Since we started from the corner we were more concerned about the diamonds being of equal measurement rather than a specific number of diamonds per wall. Wrapping a design around a room creates the pattern 'look' and this was my goal since we were working with limited space.
Next, we aligned the painter's tape along the outside of the light-colored line where you DO NOT want to paint. This may sound like a no-brainer but after this amount of math and seeing blue tape everywhere it becomes very easy to forget if you are painting inside or outside of the tape. {I have been known to use post-it notes but that was for painting stripes and will share that another day, for sure}.
Anyway, the next part is very important for crisp lines, which are essential when painting geometric shapes on walls. Using the light color (base color of wall) paint the edges of the tape to create a seal. This way, if paint seeps under the tape, it will be the same color as the base color of the wall. I have also learned this the hard way and had feathered edges, which is not a pretty site. This little trick really does work and produces professional results.
Once the paint is dry, roll on the darker color in the diamond shape. This is the easiest part of the process so sit back, relax and roll.
Finally, pull off the tape at a 45-degree angle to the wall. You may think I am being a little picky with the whole degree thing but it really matters. Also, it is fine to pull off the tape as soon as you finish painting, you do not need to wait for the diamond to dry.
And since you made it to this part of this little tutorial.. here are diamonds a la Libby Lane Press :
When we moved into our house five years ago I knew I wanted something a little different and dramatic for the dining room. At that point wallpaper was not my thing, although I lust over it now despite the painful hanging process. Note to self: My next dining room WILL have wallpaper. This was our first house so it has been a learning experience. Nonetheless, I am pleased when I see the outcome of the many pencils marks, levels and pieces of paper with various mathematical problems scribbled all in pursuit of the perfect dimension for the dining room diamonds.
Once, I knew the color palette I was looking for I bought a large piece of foam board, painted it, held it to the wall at different times of day to determine if I could live with it. Some may think this is a little over the top, but this was also a live and learn lesson that has since saved me time, energy and paint! I settled on two blue-ish gray colors. The lighter tone being the base color and the darker as the diamond.
Next, was truly the most complicated part out of this process. Trying to measure and line up the diamonds to the walls was rather cumbersome especially since we were only working with 2 full walls, not an enclosed area. So, we started in the corner and worked our way out.
First, we measured the wall space and then divided the width and height by the amount of diamonds we were hoping to paint. This was tweaked a few times once we actually used a pencil and drew the lines on the walls and used blue painter's tape to test the results of the math. Since we started from the corner we were more concerned about the diamonds being of equal measurement rather than a specific number of diamonds per wall. Wrapping a design around a room creates the pattern 'look' and this was my goal since we were working with limited space.
Next, we aligned the painter's tape along the outside of the light-colored line where you DO NOT want to paint. This may sound like a no-brainer but after this amount of math and seeing blue tape everywhere it becomes very easy to forget if you are painting inside or outside of the tape. {I have been known to use post-it notes but that was for painting stripes and will share that another day, for sure}.
Anyway, the next part is very important for crisp lines, which are essential when painting geometric shapes on walls. Using the light color (base color of wall) paint the edges of the tape to create a seal. This way, if paint seeps under the tape, it will be the same color as the base color of the wall. I have also learned this the hard way and had feathered edges, which is not a pretty site. This little trick really does work and produces professional results.
Once the paint is dry, roll on the darker color in the diamond shape. This is the easiest part of the process so sit back, relax and roll.
Finally, pull off the tape at a 45-degree angle to the wall. You may think I am being a little picky with the whole degree thing but it really matters. Also, it is fine to pull off the tape as soon as you finish painting, you do not need to wait for the diamond to dry.
And since you made it to this part of this little tutorial.. here are diamonds a la Libby Lane Press :
Don't mind the obtrusive light fixture.. just wanted you to see the end result from afar.
Tuesday, September 20, 2011
REAL PARTIES: Puppy Pawty for Abby
Who let the dogs out? {couldn't help myself}
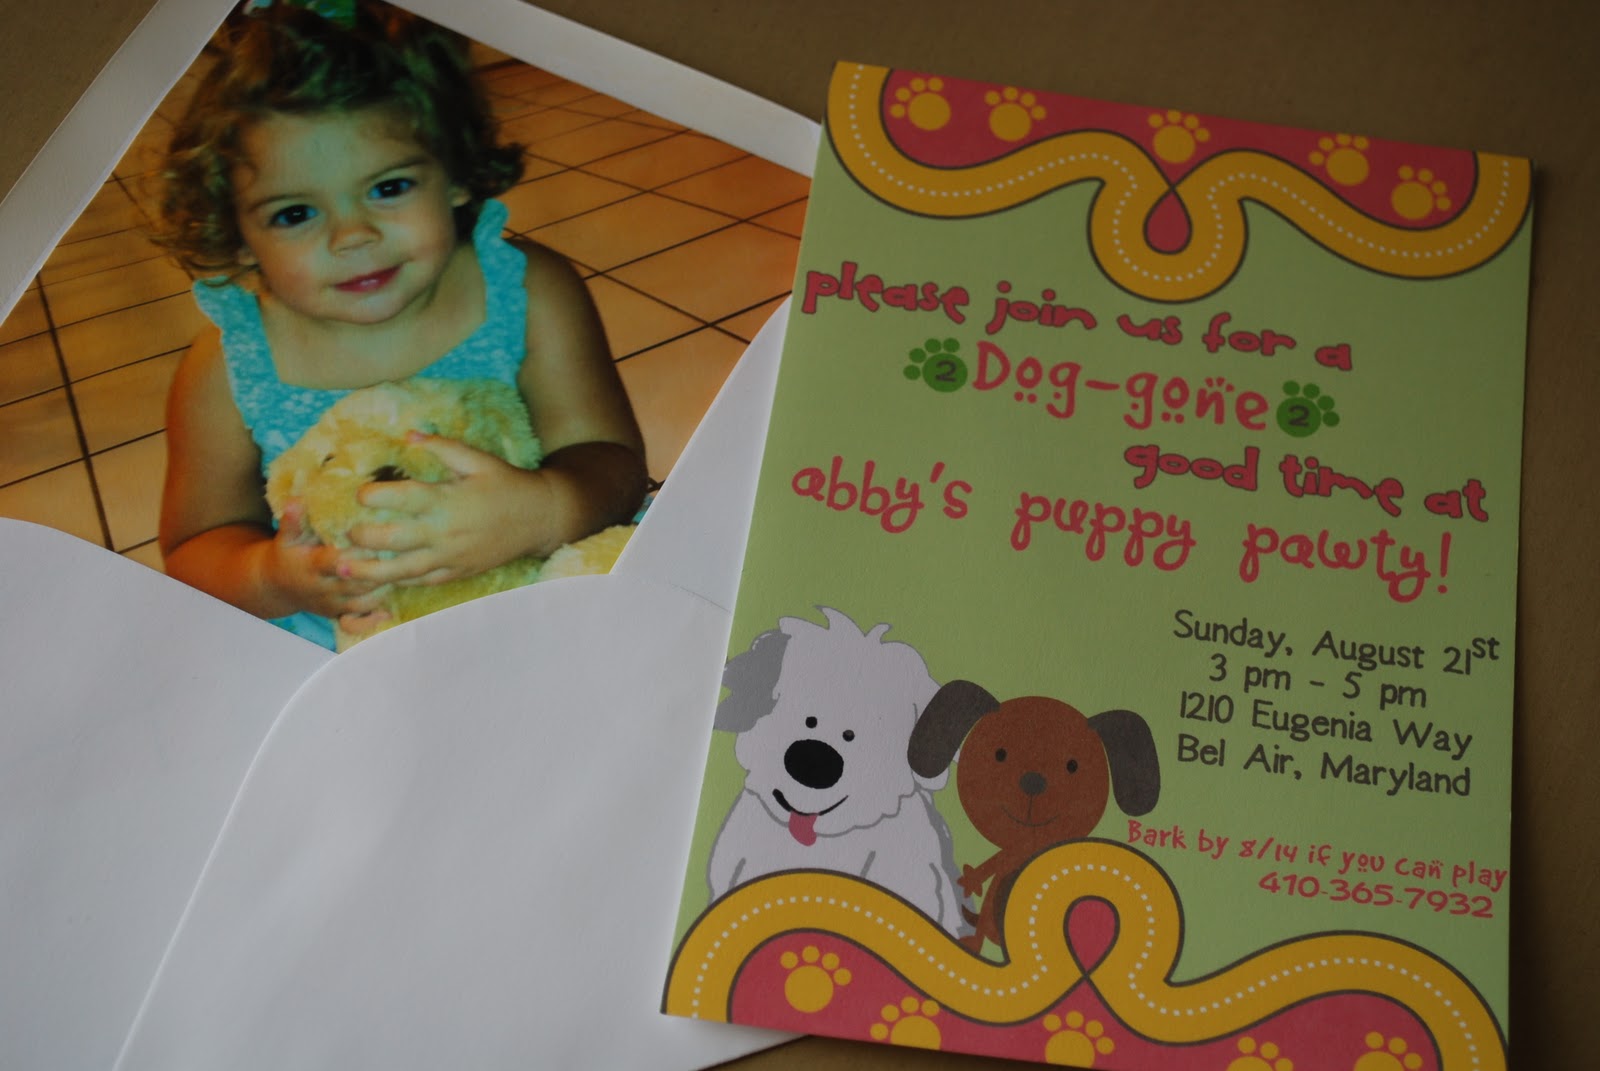
Sweet Abby turned 2 and couldn't imagine a better way to celebrate her day than with her favorite neighborhood four-legged friends joining her 'pawty'. So, Abby's mom contacted me to create a custom invitation that would be perfect for Abby's friends, both dogs & toddlers. I was able to capture Abby's favorite color scheme and incorporate a picture of the birthday girl with her favorite pal on the lined envelope. The envelopes were also addressed to coordinate with the invitation and look like a dog tag.
Wait until you see the pictures from this adorable party. From the snacks served in dog bowls, to the dog bone shaped crayons and dog hair bows that served as favors, this party was perfect, no bones about it!
You can find the Puppy Pawty Invitation here. {Full Collection to follow}
Sweet Abby turned 2 and couldn't imagine a better way to celebrate her day than with her favorite neighborhood four-legged friends joining her 'pawty'. So, Abby's mom contacted me to create a custom invitation that would be perfect for Abby's friends, both dogs & toddlers. I was able to capture Abby's favorite color scheme and incorporate a picture of the birthday girl with her favorite pal on the lined envelope. The envelopes were also addressed to coordinate with the invitation and look like a dog tag.
Wait until you see the pictures from this adorable party. From the snacks served in dog bowls, to the dog bone shaped crayons and dog hair bows that served as favors, this party was perfect, no bones about it!
You can find the Puppy Pawty Invitation here. {Full Collection to follow}
| Invitation & photo lined envelopes |
| Matching envelope addressing |
![]() |
| Abby and her best pals |
![]() |
| dog-gone good sweets |
![]() |
| Abby's special cupcake |
![]() |
| pawty favors for the pups |
![]() |
| keeping with the theme |
![]() |
| favor stickers that were attached to the favors |
![]() |
| Favors! |
![]() |
| Love the display |
![]() |
| Activities for everyone: big, small and stuffed |
| bows for the girls |
| craft table |
| Even the crayons match! |
![]() |
| such a fun party |
Tuesday, September 13, 2011
Creative Closet Crush?
So, pretty much like the rest of the creative thinkers out there, I am obsessed with Pinterest. I have talked about it before on my blog, shared 'pins' with my husband {and no, he is not on Pinterest but I force him to endure looking at my ideas ad nauseam} and look regularly for my daily dose of inspiration. I view Pinterest as a form of digital intervention to my countless pieces of paper scattered around my desk with ideas, pictures, images of just about everything I would love to create, design or do. I now even have customers sending me their Pinterest boards that they have created for their children's birthday parties- I LOVE this! Talk about being truly able to match an invitation to someone's vision. Perfection.
Well, my current Pinterest swooning involves organization and work spaces. I am on a mission to organize my home work space which has now become Libby Lane Press central headquarters. My children can be found walking around with craft punches, ribbons dragging behind them and lollipop sticks that they think are 'broken' since the lolli seems to be missing. Sad, I know. So, I called on a good friend who also happens to dabble in the world of professional organizing and she helped me to get started. We have emptied the storage closet outside of my office, purchased matching storage containers in various sizes, labeled them and stored the items in perfect little spots. This is a work in progress, but it's a start.
Here is a little eye candy for you, thanks to Pinterest, of course.
I would love to hear how you create organization in your own home office/studio..
Well, my current Pinterest swooning involves organization and work spaces. I am on a mission to organize my home work space which has now become Libby Lane Press central headquarters. My children can be found walking around with craft punches, ribbons dragging behind them and lollipop sticks that they think are 'broken' since the lolli seems to be missing. Sad, I know. So, I called on a good friend who also happens to dabble in the world of professional organizing and she helped me to get started. We have emptied the storage closet outside of my office, purchased matching storage containers in various sizes, labeled them and stored the items in perfect little spots. This is a work in progress, but it's a start.
Here is a little eye candy for you, thanks to Pinterest, of course.
![]() |
| Realistic and a pretty alternative to a room |
I would love to hear how you create organization in your own home office/studio..
Monday, August 29, 2011
And you thought they were just noodles...
So, I was in line at the grocery store on Friday with both of my children and every person on the East Coast {ok, maybe an exaggeration}. Despite the madness, my screaming son, and a long line of frantic, over-buying shoppers I was lured to the Taste of Home Ultimate Halloween magazine. Now it was the candied apples on the cover that first caught my eye, but then I was quickly captivated by the clever ideas, fun recipes, and helpful hints to throw a spooktacular soiree. I plan to try a few of the recipes for my own Halloween festivities but in the meantime I had to share this cute little guy. I feel like I see a bug-eyed monster on every other Halloween invitation so in the spirit of the times you can now create a cupcake to match using chow mien noodles. So when you have a little time and a few spare noodles, go ahead and check out the recipe and give this little spiky friend a whirl.
And tomorrow, I plan to share my dog-gone fun pawty that I promised last week.. No bones about it!
![]() |
| Photo Source: Taste of Home |
Saturday, August 27, 2011
And the winner is...
Delilah's Delights!
Congratulations to #11:
delilahsdelights55 said...
I alreally follow libby lane on twitterI alreally follow libby lane on twitter
Please email me at nicolle@libbylanepress.com so I can gather information to mail your $20 Staples giftcard!
Thanks for following Libby Lane Press
Subscribe to:
Posts (Atom)